Traces: Kanban View
The Kanban view offers a clear and structured overview of Traces grouped by status. It helps users quickly understand the current workload and status distribution. Users can open individual Traces directly from the board to review or update them as needed.
Kanban Board Overview
To access the Traces module, go to the sidebar menu and expand the Traces section. Then click on the “Traces” item in the sub-menu. This will open the module in Kanban view by default.
The Kanban board is divided into five columns, each representing a Trace status with a specific color. All columns are expanded by default, but there is a way to collapse each column. Each column displays traces that currently have the corresponding status. Here is the list of statuses:
- To Do - the trace is newly created and awaiting action
- In Progress - work on the trace has begun
- Completed - the trace has been successfully resolved
- Cancelled - the trace is no longer relevant and has been closed without action
- On Hold - the trace is temporarily paused but not closed
Next to the plus icon at the top of each column, you can hover your cursor to reveal the Actions icon. This gives you options to collapse or extend the column, as well as to archive it if needed.
Below the plus icon, a number is shown indicating how many Traces are currently in that status. By default, the system displays up to 80 Traces per column. If there are more than 80, a “Load more...” option will appear at the bottom of the column to display additional Traces.
A default filter called “My Department” is applied, showing only the Traces that belong to the same department as the logged-in user. This helps users focus only on what is relevant to their team. If the default filter is removed, all available traces will be displayed on the board.
Create Trace via Kanban
The Kanban view provides a clear and structured overview of Traces grouped by status. It helps users quickly understand the current workload and status distribution. Users can open individual Traces directly from the board to review or update them as needed.
To create a new Trace in the Kanban view, there are two available options:
- Click the New button at the top of the board.
- Click the plus icon in the desired column, which will pre-select the corresponding status.
In both cases, a quick creation form will appear, where you need to enter the following basic information:
- Trace Name (title of a trace)
- Priority (low, medium, or high)
- Category (for example, Operational Duty, Maintenance, Guest Request)
- Department responsible for handling the Trace
Once saved, the Trace will appear in the relevant column based on its status.
Kanban Card Layout
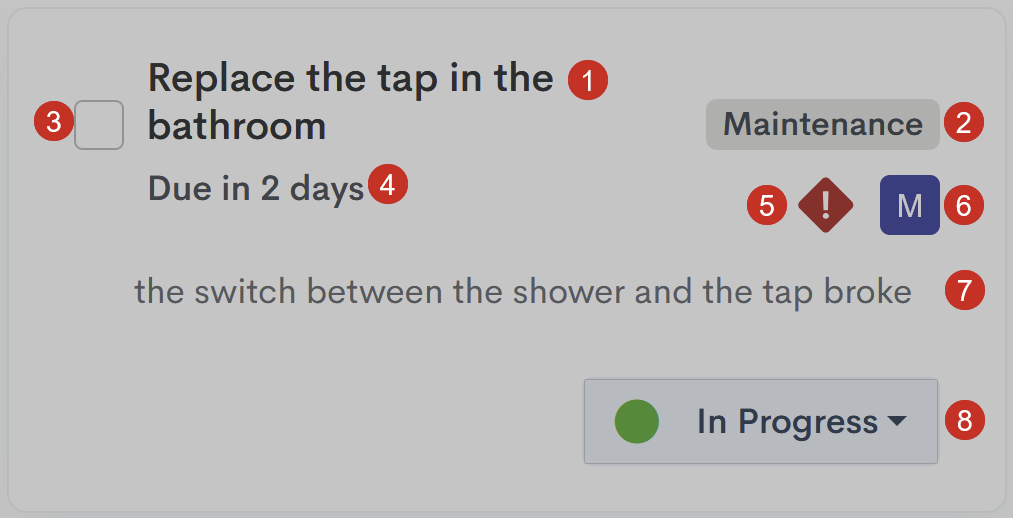
Each Trace card on the Kanban board displays key information and actions in a compact format:
- Trace name – the title of the trace, shown as the main label.
- Category – displayed as a tag or label to indicate the type of trace.
- Completion checkbox – allows users to mark a trace as completed from any status, without opening the full form.
- Due date - date and time by which the trace must be completed
- Priority icon – shows the trace priority (low, medium, or high) with a corresponding visual indicator.
-
Assigned user – displays the avatar or initials of the assigned person, or allows assignment if not yet set.
- Trace description - short description of what should be done.
- Status bar – the drop-down that lets users change the trace’s status directly from the card.
There are no comments for now.
to be the first to leave a comment.